
在工作组环境下的 ISA Server 2006 上发布 Windows SBS 2003 R2 ST 中的 Exchange Server OWA
[ 2008/09/17 18:11 | by gOxiA ]


在工作组环境下的 ISA Server 2006 上发布 Windows SBS 2003 R2 ST 中的 Exchange Server OWA
环境说明:
两个子网(子网 A 和子网 B)分别是两个独立的 AD,其中子网 B 基于 Windows SBS 2003 R2,共同使用同一台 ISA Server 2006 访问互联网,并同时使用同一个公网 IP 用于服务的发布。其中 子网 A 暂不提供邮件服务的发布。
实施目标:
使用 ISA Server 2006 发布子网 B 中 Windows SBS 2003 R2 上 Exchange Server 的 OWA
实施要点:
1、导出 Windows SBS 2003 R2 中涉及的证书;
2、修改 Exchange Server 中的 HTTP 协议,禁用“启用基于表单的身份验证”;
3、在 ISA Server 2006 上导入 Windows SBS 2003 R2 的证书;
4、在 ISA Server 2006 上访问 OWA 进行测试,确保访问过程无任何提示警告(如:证书警告);
5、在 ISA Server 2006 上配置 LDAP 服务器的访问;
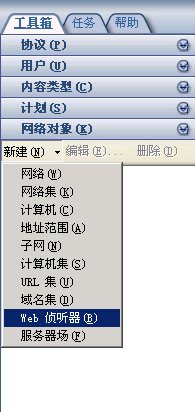
6、在 ISA Server 2006 上创建用于发布服务的端口侦听;
7、在 ISA Server 2006 上创建用于发布 OWA 的防火墙策略;
实施步骤:
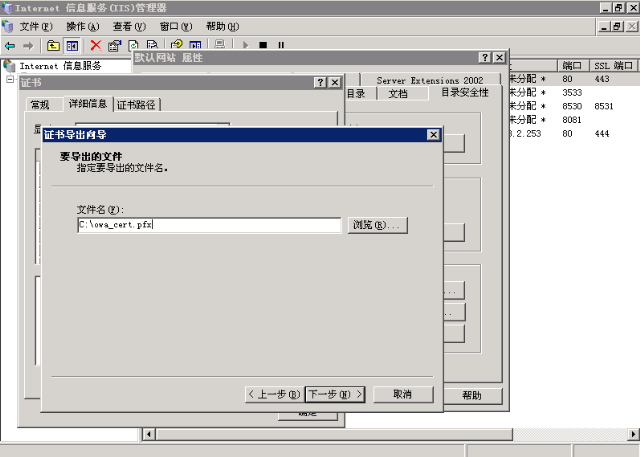
一、在 Windows SBS 2003 R2 中导出证书,该证书用于 ISA Server 2006 发布 OWA 时所需。
1、在 Windows SBS 2003 R2 上打开 IIS 管理器,进入 Exchange 站点属性。
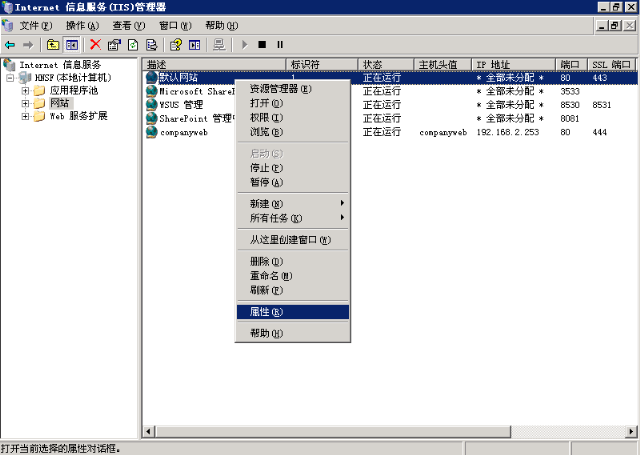
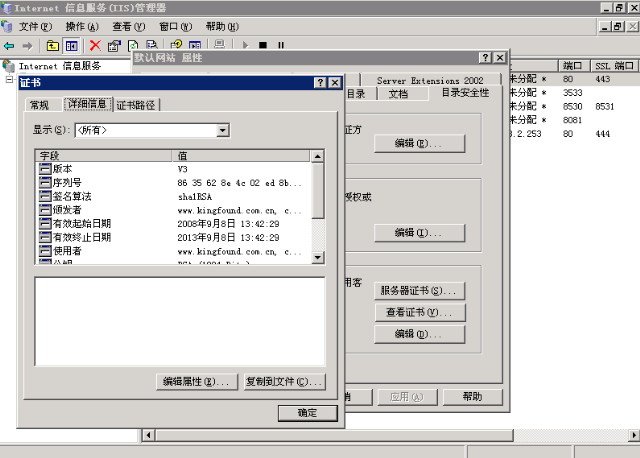
2、切换到“目录安全性”选项页,单击“查看证书”,在“证书”的“详细信息”选项页中单击“复制到文件”,将该证书导出。
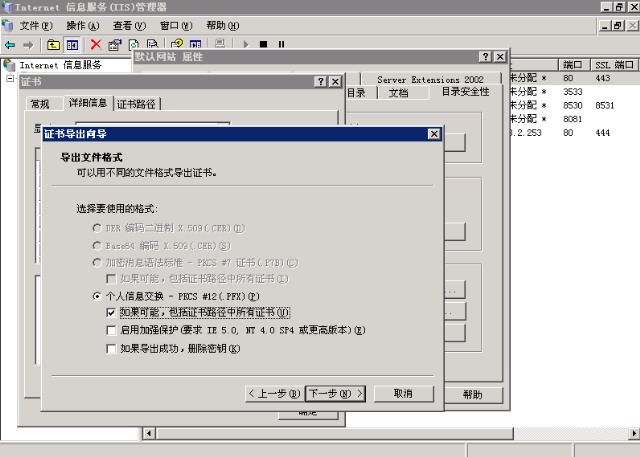
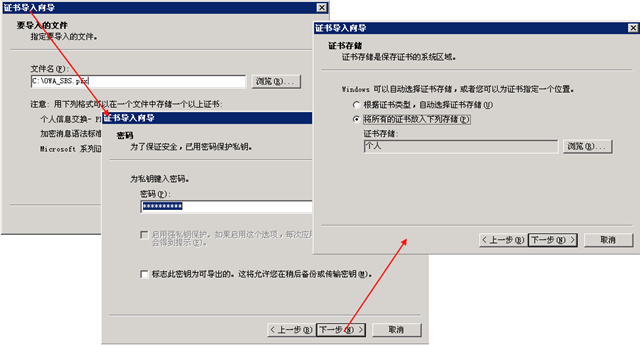
3、在证书导出向导中,选择导出私钥。

4、个人信息交换复选中,勾选“如果可能,包括证书路径中所有证书”。
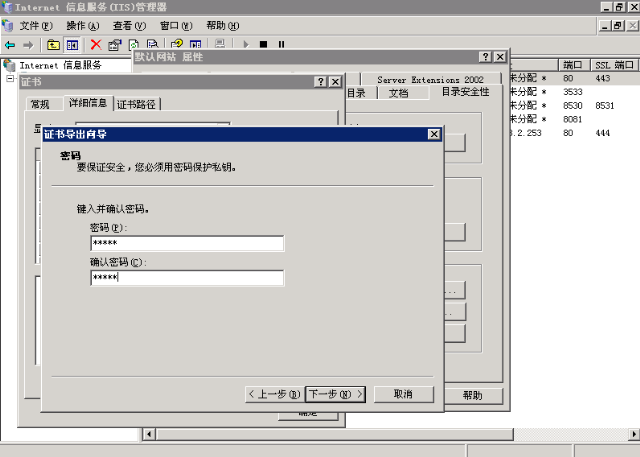
5、由于要导出私钥,所以会要求我们键入一个用于保证私钥安全的密码。
6、最后,将导出的证书保存到我们指定的一个位置。
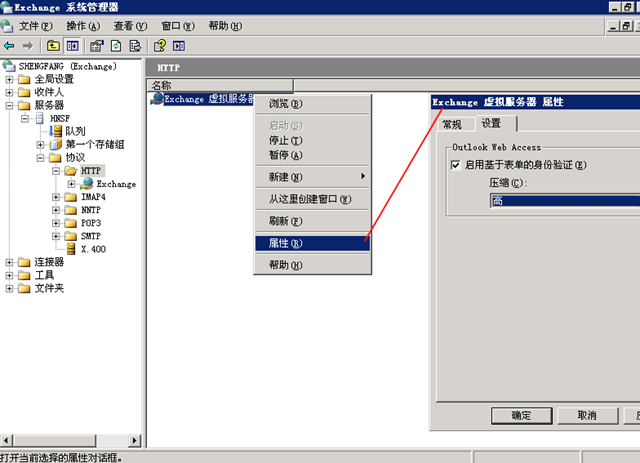
二、禁用 Exchange 的“启用基于表单的身份验证”,才能保证 ISA Server 2006 正确发布 OWA。
为此,在 Windows SBS 2003 R2 上,运行 Exchange 的系统管理器,切换到当前服务器-“协议”-“HTTP”-“Exchange”,鼠标右键单击“Exchange 虚拟服务器”进入“属性”-“设置”,去除“启用基于表单的身份验证”勾选。
三、在 ISA Server 2006 上导入 Windows SBS 2003 R2 的证书。
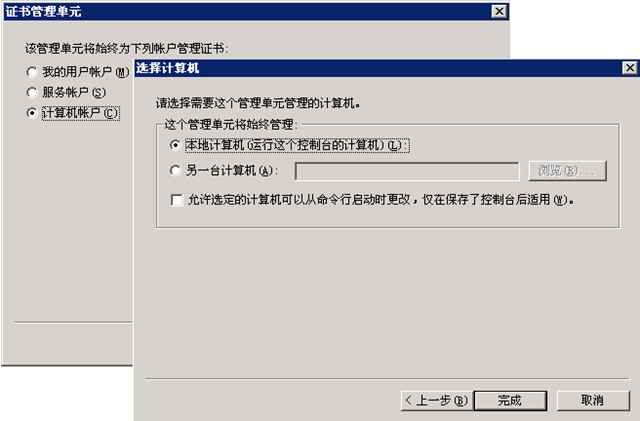
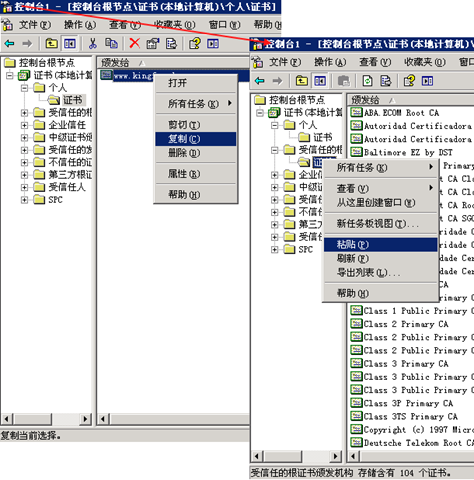
为此,通过在“运行”框中键入“mmc”启动 MMC 控制台,在“文件”菜单下单击“添加删除管理单元”,之后单击添加,选中“独立管理单元”下的“证书”进行添加。

在随后的向导界面中,选择添加“计算机帐号”,并指定为“本地计算机”。
之后,我们在“个人”-“证书”中导入证书。
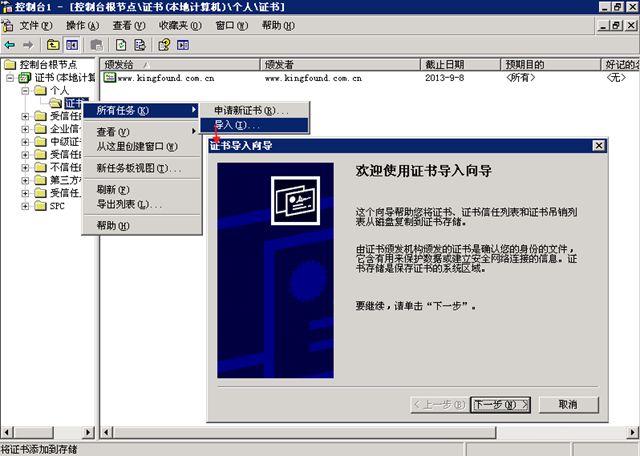
按照向导提示,选择证书所在位置,并键入私钥密码,最后将证书保存在个人存储中。
到这里还并未完成,由于 ISA Server 2006 不在子网 B 的 AD 中,所以无法认证 CA Root,故我们要将该证书导入到受信任的根证书颁发机构。为此,我们只需要在将“个人”-“证书”下的证书复制并粘贴到“受信任的根证书颁发机构”下即可。
四、现在我们要在 ISA Server 2006 上访问 Windows SBS 2003 R2 上的 OWA 进行测试,检查是否在连接过程中出现错误或证书警告,并执行相应的排错。注意,由于在 Windows SBS 2003 R2 上配置邮件时,填写的是公网域名,所以生成的证书地址将对应此公网地址,所以在 ISA Server 2006 上进行访问测试前,建议修改“%WINDIR%system32driversetc”目录下的“hosts”添加一条记录,将此公网域名指向到 Windows SBS 2003 R2 的内网地址上。
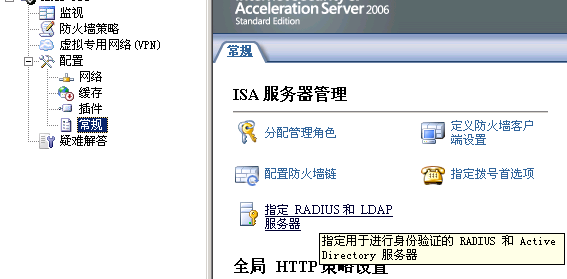
五、由于环境的特殊性,ISA Server 2006 并不隶属于子网 B 中的 AD,所以在发布 OWA 时涉及到的身份验证传输就需要依靠 LDAP。为此,我们打开 ISA Server 2006 控制台,切换到“配置”-“常规”下,单击“指定 RADIUS 和 LDAP 服务器”。
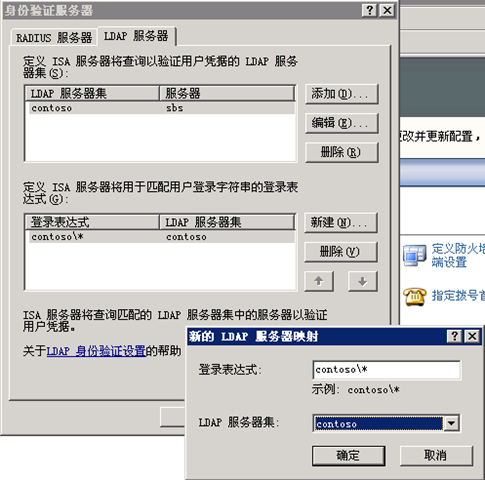
在 LDAP 服务器选项页中,我们添加一个 LDAP 服务器级,将其命名为“contoso”,并添加一个服务器,机器名为“sbs”,可以在描述中注释该机器的 IP 地址,并键入 "Active Directory 域名(使用完全限定的域名)"为“contoso.com”,同时提供有权限查询该AD的帐号和密码。

最后,添加用于匹配用户登录字符串的登录表达式“contoso*”,LDAP 服务器集选择为刚才创建的“contoso”。
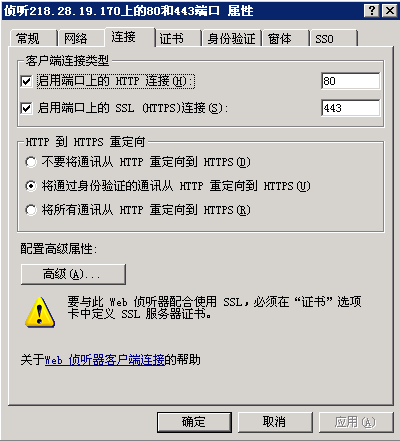
六、所有的前期准备工作基本上都完成了,下面我们来创建用于发布 OWA 的端口侦听,这里我们要用到 TCP 80 和 443,虽然 OWA 需要 SSL 连接方式,而默认只使用 443 端口,但是由于还要发布其他非 SSL 连接的网站,故我们同时要添加对 80 端口的侦听。为此,在网络对象中新建“Web 侦听器”,启动向导页后,将这个侦听命名为“Listen 80 & 443”。

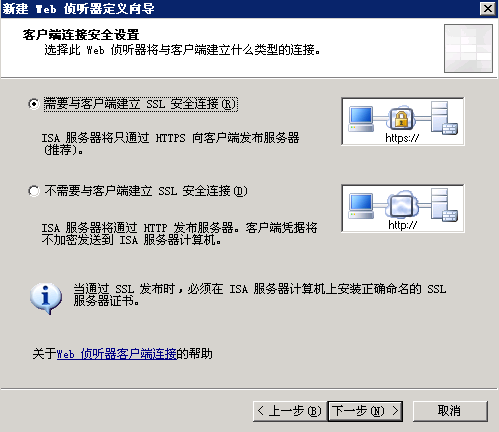
选择“需要与客户端建立 SSL 安全连接”。
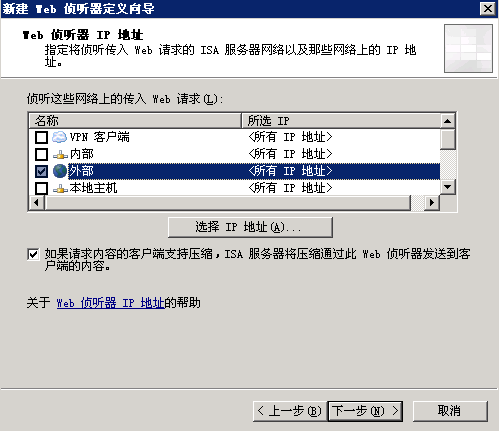
从“外部”侦听传入的 Web 请求。
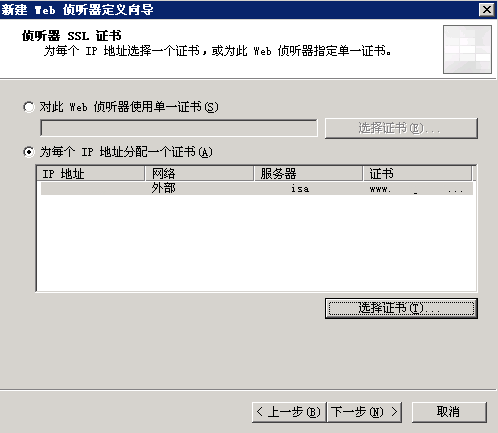
在“侦听器 SSL 证书”向导页,单击“选择证书”。
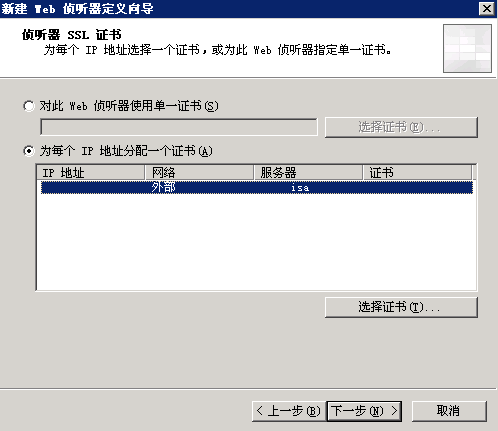
选中之前导入的证书。

确认无误后,单击“下一步”。
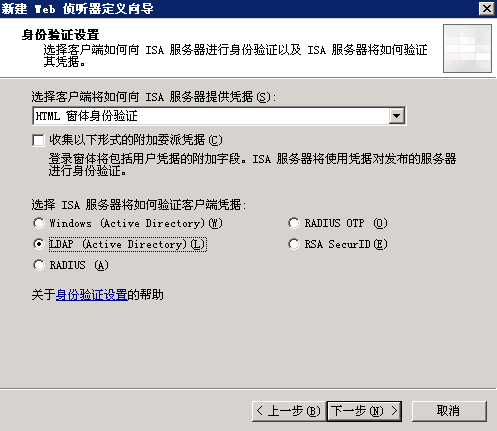
身份验证设置中,选择使用“HTML 窗体身份验证”的方式,并选择使用“LDAP (Active Directory)”来验证客户端凭据。
由于 Windows SBS 2003 R2的特殊性,我们需要再对“Listen 80 & 443”进行配置,勾选“将通过身份验证的通讯从 HTTP 重定向到 HTTPS”,这样保证了我们在通过“www.contoso.com/exchange”作为地址方式时,系统会自动帮我们重定向为“https://www.contoso.com/exchange”并进入 ISA Server 2006 的 “HTML 窗体身份验证”。
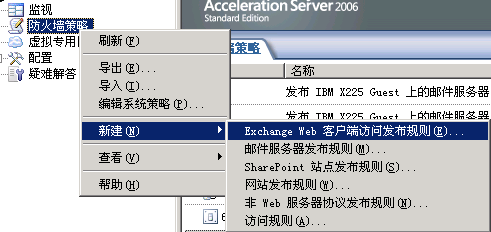
最后,创建“Exchange Web 客户端访问发布规则”,右键单击“防火墙策略”,单击“新建”-“创建 Exchange Web 客户端访问发布规则”。
将该发布规则命名为“Publish OWA”。

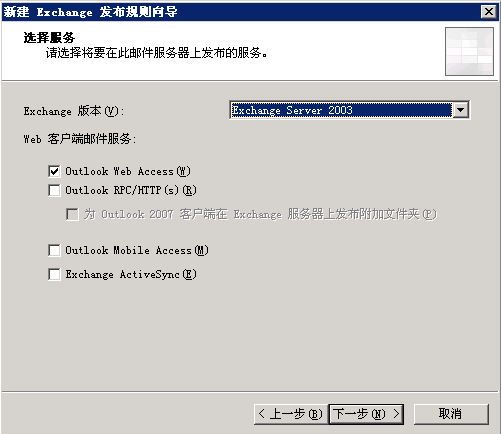
选择 Exchange 版本为 Exchange Server 2003,在“Web 客户端邮件服务支持”下勾选“Outlook Web Access”。
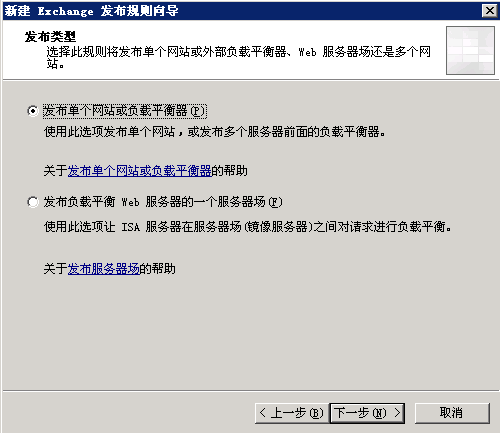
选择“发布单个网站或负载平衡器”作为发布类型。
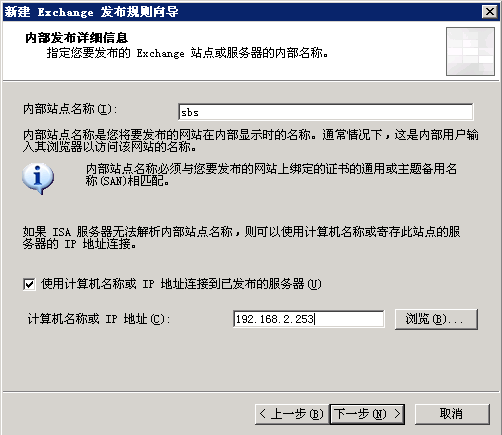
填写内部站点名称,并根据需要复选“使用计算机名称或IP地址连接到已发布的服务器”,在此我填写的是IP地址。
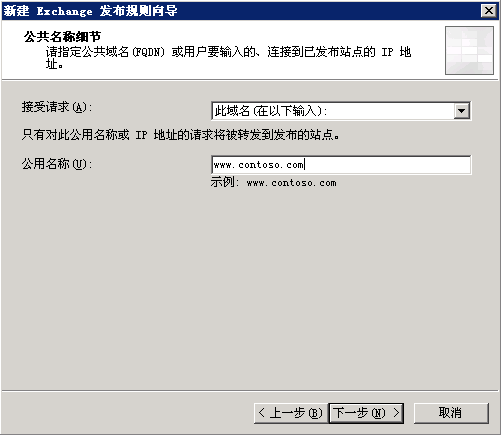
在“公用名称细节”这里填写我的公用名称“www.contoso.com”,在实际环境中,可能会更多的使用“mail.contoso.com”作为访问地址,同时更希望直接通过“mail.contoso.com”来访问 OWA 而不是“https://mail.contoso.com/exchange”,这些都是可以实现的,不过我会放在以后与大家介绍具体的实施方法。
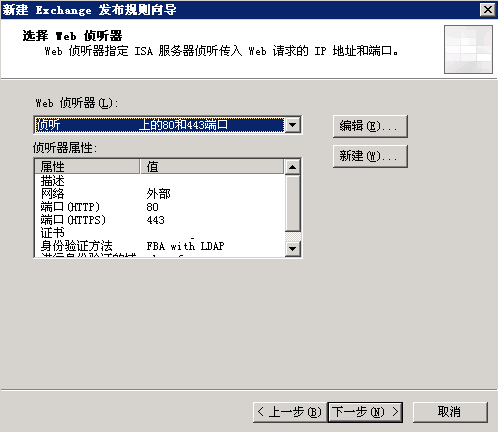
选择我们之前创建好的 Web 侦听器。
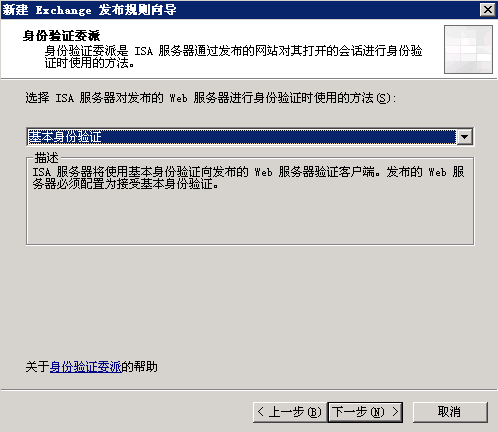
“身份验证委派”我们选择使用“基本身份验证”的方法。
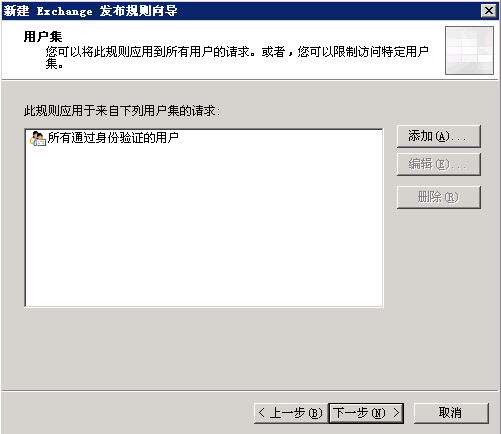
默认应用于来自“所有通过身份验证的用户”请求。
由于此环境并未设计到单点登录,所以在下一步的单点登录配置向导,我们可以去除复选,最后完成 OWA 的发布。现在我们可以在外部的客户端通过 IE 浏览器来访问 OWA 了。如果提示证书警告,直接忽略继续访问即可。这是由于客户端的受信任证书颁发机构中并不存在 OWA 的证书。针对此问题我们可以单独导出一个证书链提供给用户下载,并导入到客户端本地受信任证书颁发机构中。
尾注:本实施说明纯粹为了作技术备忘,并没有完全去介绍每个细节的概念,如需了解更多的 OWA 发布细节可以在网上搜索。


