[MDT] Microsoft Deployment Toolkit 2010 Now Released

Get ready to deploy Windows 7 and Windows Server 2008 R2 with the final release of Microsoft Deployment Toolkit 2010
Click here to download MDT now. (http://go.microsoft.com/fwlink/?LinkId=159061)
As you prepare to deploy Windows® 7 and Windows Server® 2008 R2, get a jump start with Microsoft® Deployment Toolkit (MDT) 2010. Leverage this Solution Accelerator to achieve efficient, cost-effective deployment of Windows 7 and Windows Server 2008 R2.
MDT is the recommended process and toolset to automate desktop and server deployment. MDT provides you with the following benefits:
Unified tools and processes required for desktop and server deployment in a common deployment console and collection of guidance.
Reduced deployment time and standardized desktop and server images, along with improved security and ongoing configuration management.
Fully automated Zero Touch Installation deployments by leveraging System Center Configuration Manager 2007 Service Pack 2 Release Candidate and Windows deployment tools. For those without a System Center Configuration Manager 2007 infrastructure, MDT leverages Windows deployment tools for Lite Touch Installation deployments.
MDT 2010 includes new features such as flexible driver management, optimized user interface workflow, and Windows PowerShellTM command line interface to help simplify deployment and make your job easier. Deploy faster and more easily with MDT 2010.
New in MDT 2010
Improvements in MDT 2010 allow you to:
Access deployment shares from anywhere on the network and replicate files and settings across organizational boundaries or sites.
Organize and manage drivers, operating systems, applications, packages, and task sequences with an improved UI.
Automate UI functionality using the new Windows PowerShell command line interface.
Next steps
Download Microsoft Deployment Toolkit 2010. (http://go.microsoft.com/fwlink/?LinkId=159061)
Learn more about MDT by visiting the MDT site on TechNet. (www.microsoft.com/mdt)
Get the latest news by visiting Microsoft Deployment Toolkit Team blog. (http://blogs.technet.com/msdeployment/default.aspx )
Provide us with feedback at satfdbk@microsoft.com.
If you have used a Solution Accelerator within your organization, please share your experience with us by completing this short survey (http://go.microsoft.com/fwlink/?LinkID=132579).
[MDT] HOWTO : 配置 Custom image File 使用 Task Sequences
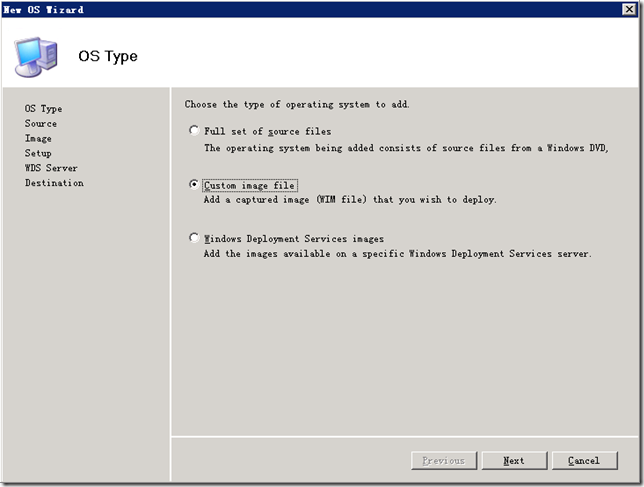
企业 ITPro 灵活运用 Microsoft Deployment Toolkit (MDT)部署 Windwos 操作系统,有效地减少了系统维护的工作量,同时也降低了总体拥有成本。很显然当前企业仍在使用 Windows XP 的大有人在,所以众多朋友致力于研究通用型 Windows XP 部署映像,便于在不通硬件类型的计算机上安装。gOxiA 虽然应用 MDT 有几年了,但是也是最近才开始学习制作通用型 Windows XP 映像,目前系统映像已经制作完毕并开始进入测试阶段。所以在 MDT 中使用 Custom image File(自定义映像文件)方式来添加操作系统源,如下图所示。
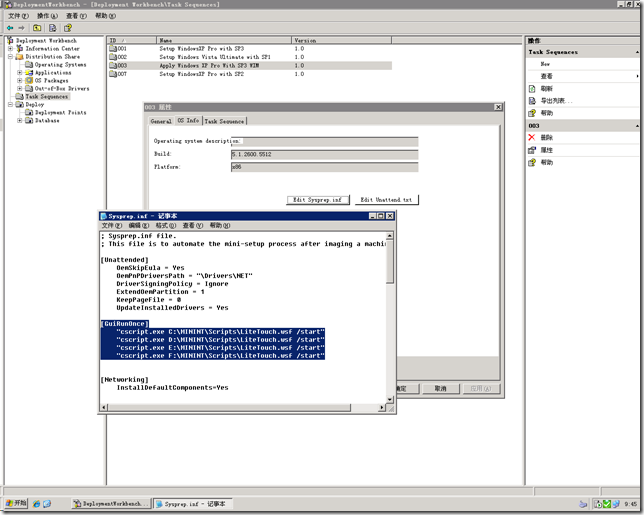
之后按照往常一样添加任务,更新部署点并执行部署测试。整个过程很顺利系统成果的被部署在了不通硬件的计算机上,但是发现在部署过程中选择附加要安装的应用程序后,在后续阶段并没有正确执行。也就是说当我完成了操作系统的安装第一次进入桌面后应该自动启动 MDT 的 LTI 脚本程序完成后续的应用程序安装、补丁更新……直至任务全部完成并给出报告。看来是哪里出了问题,查阅网上的资料,MDT 任务脚本程序后续的调用执行依靠 Sysprep 中 GuiRunOnce 字段的配置,这样系统完成部署后第一次进入系统就会执行 GuiRunOnce 配置下的程序。如下图所示,MDT 创建的 Sysprep 文件中 GuiRunOnce 字段下执行了 LiteTouch.wsf 脚本。
OK!现在对 Custom image File 映像执行检查。登录部署服务器,单击“开始”-“所有程序”-“Microsoft Windows AIK”-“Deployment Tools Command Prompt”,进入 WAIK 的命令行环境。
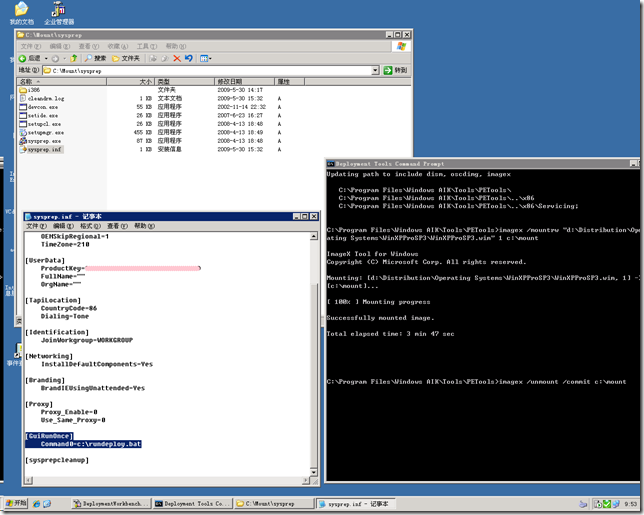
执行下面的命令行,将已经添加到 MDT 中的 Windows XP Pro Sp3 自定义映像挂载到系统分区中事先创建好的 Mount 目录中。
经查发现自定义映像中的 sysprep.inf 中 RuiRunOnce 字段下只有我手工添加的批处理命令。问题已经明了!我只需要在 Custom image File 下的 Sysprep.inf 中的 GuiRunOnce 字段里手工添加执行 LiteTouch.wsf 脚本的命令即可! 为了避免不通环境中 MININT 目录可能并不在默认的 C 盘中,我们可以在 GuiRunOnce 字段里添加多个盘符下的 LiteTouch.wsf 脚本执行命令,具体可以参考 MDT 创建的 Sysprep.inf 文件。
最后执行 imagex 命令,并加上"/unmount" (卸载映像)和 "/commit"(保存修改)两个参数,将所做的修改保存至映像中。
当然即使你不执行上面的操作依然使用 MDT 来部署 Custom image File 也是可行的,唯一需要的就是在执行部署后需要手工找到 LiteTouch.wsf 的位置并执行它,以完成后续的任务。gOxiA 在想,如果与常规安装源一样,MDT 在部署 Custom image File 时能强行替换掉映像中的 Sysprep 文件,那么问题不就得到了彻底的解决,而且也能充分利用 MDT 的自动化技术。
[MDT] 从 MDT2008 升级至 MDT2010 Beta1

在上一篇 Blog —— Microsoft Deployment Toolkit 2010 Beta1 正式发布 中提到可以通过 Micrsoft Connect 申请 MDT2010 Beta1 的测试。gOxiA 利用闲暇时间进行了下载,并在原有 MDT2008 的基础上直接进行升级,平滑过渡到 MDT 2010 Beta1。
整个的升级过程非常简单,直接运行下载的 MDT2010 Beta1 安装包根据向导一步步执行即可!安装完毕后运行 DeploymentWorkbench,切换至 Distribution Share,会发现原有的配置信息都消失了。根据之前 MDT2008 的更新经验,只需要通过 Create Distribution Share 对现有的 Distribution 进行更新即可,但是当执行该操作时提示了如下的操作。根据提示,当前的 WAIK 版本需要更新。可以从 Windows Automated Installation Kit for Windows 7 Beta 这篇 Blog 获取最新的 WAIK 下载信息。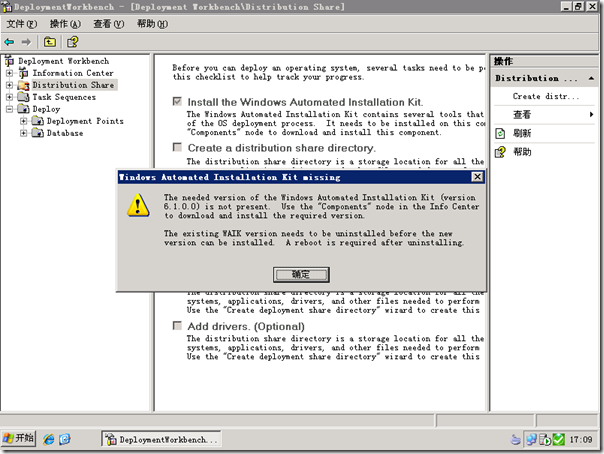
安装了最新的 WAIK 后便可以执行 Create Distribution Share,选择“Upgrade an existing distribution share” 对之前的 Distribution 进行升级。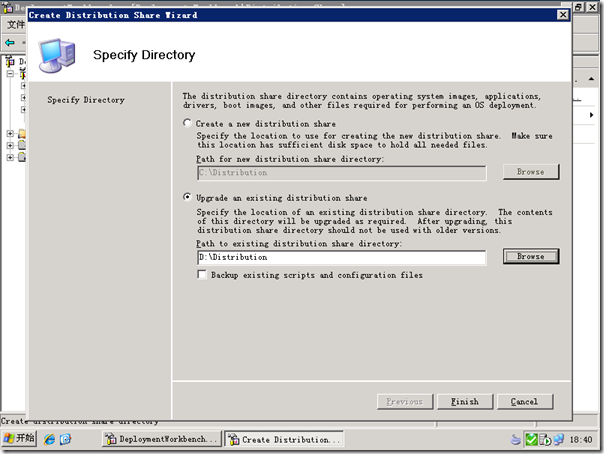
之后便可以看到之前的配置信息都已经出现在管理控制台中,接下来我们还需要对 Deployment Points 进行更新重新生成启动映像并重新添加到 WDS 中。