[SBS]HOWOT:手工重建 Windows Small Business Server 2011 Standard 的 SharePoint 站点
HOWOT:手工重建 Windows Small Business Server 2011 Standard 的 SharePoint 站点(Internal Web site)
Windows Small Business Server 2011(简称:SBS2011)内置的 SharePoint 为用户提供了丰富的协作和文档管理功能。当首次完成安装并执行配置任务后, SBS2011 会自动为你创建并配置好一个 SharePoint 站点,这样用户便可以从内部或外部访问该站点。但是,在日后如果 SharePoint 出现问题,网站无法访问或被误删除,那么用户要重建这个站点就比较麻烦了,在默认的恢复解决案中,用户只能通过恢复系统备份来实现。如果按照 SharePoint 常规的站点创建步骤,虽然也能恢复但是我们无法在 SBS 控制台上监控到该站点的运行情况。此外,由于 SharePoint 在 SBS 上是高度集成的,常规方式建立起来的 SharePoint 站点可能无法完全被访问,例如通过内部 Companyweb 域名访问、通过 Remote 门户访问,或直接通过外部域名访问。
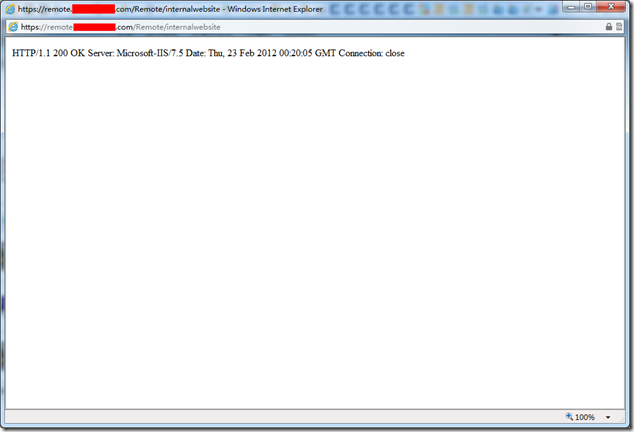
最近 gOxiA 就遇到了这个问题,在这边的环境中 SBS2011 是由测试版迁移过来的,由于设计问题 SharePoint 英文版的数据库并不完全与中文版兼容,所以需要安装语言包,而迁移过来之后由于账号等问题 SharePoint 总是出现一些莫名其妙的问题,后来 gOxiA 重建了 SharePoint 站点(保留原有内容数据库的前提下),遇到了种种困难,之前的日志也都有记录,但都有遗留问题,最近的一次排错也没有完全解决问题,当通过 Remote 门户访问 SharePoint 站点时会出现问题,具体错误可以参考下面的截图。
就在前几天,gOxiA 通过与虚拟机中运行的 SBS2011 评估环境进行了对比分析,终于搞懂了手工重建 SBS SharePoint 站点的步骤,不敢独享,特与大家分享!
实际情况先于大家简单介绍一下,gOxiA 计划将现有生产环境中的 SharePoint 管理中心和应用站点都干掉重建,并清理掉残留的配置与数据库。重建后的应用站点使用现有的内容数据库,并保证重建后的站点与 SBS 的集成无问题,从内部或外部等方式访问无问题。
(注:由于文中涉及 SBS2011 的 SharePoint 服务账号,请先阅读了解 HOWTO- 修改并同步 SBS2011 的 SharePoint 账号密码,另请在执行操作前先做好备份工作!)
首先,gOxiA 要删除原有的应用站点,并删除相关的数据库。为此打开 SharePoint 2010 管理中心,进入“应用程序管理”,选中“SBS SharePoint”站点,再单击“删除”按钮,此时会出现一个下拉菜单,我们可以先执行“从 IIS 网站删除 SharePoint”,确认 IIS 中 SharePoint 应用站点及应用程序池被删除掉后,再执行“删除 Web 应用程序”,这样做只是为了确保万无一失,否则可以直接通过“删除 Web 应用程序”来执行。
在执行“从 IIS 网站删除 SharePoint”时,请参考下图将“SBS SharePoint”和“Companyweb”站点删除。
当从 IIS 站点中删除 SharePoint 应用程序站点后,就可以执行“删除 Web 应用程序”。请特别注意!!!如果要在重建站点后使用之前的内容数据库,在这一步中一定要确认“删除内容数据库”为“否”。然后点击“删除”,以完成操作。
接下来执行删除“SharePoint 管理中心”的步骤,也就是删除服务器场设置。为此运行 SharePoint 2010 产品配置向导,在“修改服务器场设置”向导中选择“断开与此服务器场的连接”,并点击“下一步”继续,随后出现的提示框点击“是”进行确认即可。
至此,SharePoint 的清理工作基本完成,下来就可以打开 IIS 和数据库管理进行检查,如果在 IIS 中发现类似“SITE_3”这样的已停止状态站点,可以选中后直接删除,或者是有残留的未删除应用程序池,也要手工删除。出现类似的情况是由于向导程序没有彻底删除配置数据所致,这也就是之前为什么 gOxiA 提议分开执行删除应用程序站点的原因。之后再用 SQL Server Management Studio 打开数据库,除了“ShareWebDb”以外的用户数据库(“SharePoint_AdminContent_xxxxx”和“SharePoint_ConfigurationDatabase”)都删除即可。
上述步骤完成后,请先进入 ADUC 中将“SharePoint Farm Account”、“SharePoint Search Service Account”、“Windows SBS Internal Web site Account”这三个账号密码进行重置(注意:修改密码时要去除“用户下次登录时须更改密码”的复选项!)。然后就可以开始重建 SharePoint,首先运行“SharePoint 2010 产品配置向导”,“创建新的服务器场”。
在“指定配置数据库设置”向导中填写“数据库服务器”的信息,如:“sbssharepoint”,“数据库名称”可根据实际需要更名,在“指定数据库访问账户”中填写“SharePoint Farm Account”的账号(domainnamespfarm)密码。确认无误后点击“下一步”继续,在随后出现的“指定服务器场安全设置”中填写服务器场的新密码,并继续。在“配置 SharePoint 管理中心 Web 应用程序”中,可保持默认配置,或根据需要指定端口号。最后确认配置信息并完成配置。在经过短暂的等待后,新的 SharePoint 管理中心就建立完毕了!执行过程可参考下图:
SharePoint 管理中心创建完毕后会自动进入管理中心,由于我们要手工创建使用现有内容数据库并与 SBS 集成的应用站点,所以在首次启动管理中心的页面中选择“否,我要自己配置所有内容”即点击“取消”。如下图所示:
手工创建应用程序站点,需要在“应用程序管理”下进行,就是之前删除站点的位置,只不过这次点击“新建”。在“新建 Web 应用程序”页面中,在“新建 IIS 网站”下填写“SBS SharePoint”,端口为“987”,路径为“C:\Program Files\Windows Small Business Server\Bin\WebApp\InternalWebSite”,这里要特别注意 SBS 控制台除了通过 IIS 站点名称来进行识别以外,还需要通过“InternalWebSite”这个目录加载控制、配置和状态信息;所以如果当前路径下没有“InternalWebSite”这个目录一定要手工创建一个,向导程序会自动向该目录写入相关的配置文件。
往下找到“使用安全套接字层(SLL)”选择“是”使用 SSL,在 URL 地址栏中填写“https://sites:987”,在“新建应用程序池”中填写“SBS SharePoint AppPool”;
继续往下走,在“可配置账户”选项中需要先“注册新的管理账户”,注册之前的“SPWEBAPP”账号,否则保留默认的配置,待以后再改(注:如果决定在这里选择注册新的管理账户,在执行注册后回到配置页面会发现之前填写的配置都恢复了默认!则需要进行重新填写!),最后在“数控库名称”中填入“ShareWebDb”。
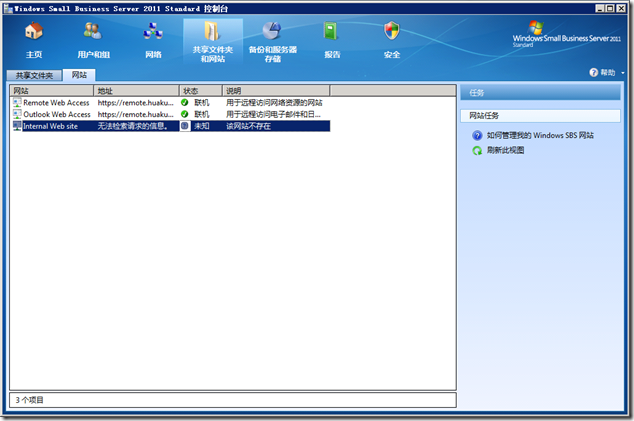
其他选项都保持默认即可,确认无误后点击“确定”。至此 SharePoint 的应用程序站点就初步建成了,打开浏览器访问“https://sites:987”试试!除了有证书警告以外,站点已经能够访问。但是还无法通过“http://companyweb”访问该站点。打开 SBS2011 控制台,切换到“共享文件夹和网站”下的“网站”选项卡,可以看到当前已经能够监控到“Internal Web site”的状态。如果“Internal Web site”状态为“脱机”,如下图所示,并且无法启用或查看站点属性,则是因为之前步骤中未手工创建“InternalWebsite”目录所致。一旦出现这种情况就需要重新创建应用程序站点……![]()
下来我们就需要进行后续的操作步骤,先回到“SharePoint 管理中心”-“应用程序管理”-“管理 Web 应用程序”中,选中“SBS SharePoint”站点,并点击“扩展”。在随后的配置页面中找到“新建 IIS 网站”并填入名称“Companyweb”,端口为“80”,主机标头为“companyweb”,其他为默认选项,并点击“确定”。
最后,回到“应用程序管理”,进入“配置备用访问映射”,单击“https://sites:987”这个 URL,修改“URL 协议、主机和端口”为“https://remote.contoso.com:987”,并点击“确定”。这一步需要说明一下,sites 这个域名是 SBS 默认创建的,在未进行 SBS 的“Internet 域名”设置前,SharePoint 应用站点等设置都是配置好的,所以会暂时使用 sites 作为外部 URL 的地址。其实在本次案例中,我们完全可以在前面直接填写实际的外部 URL 地址,如:“https://remote.contoso.com:987”。
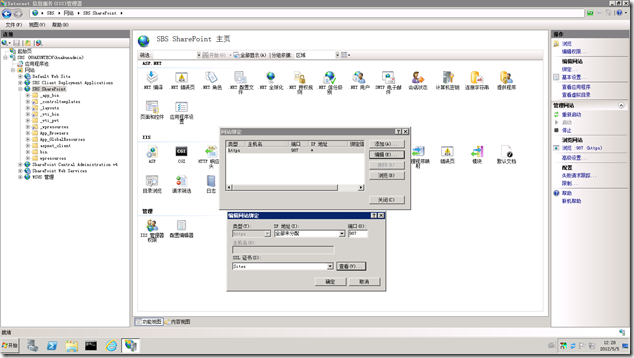
到这里本文也该结束,按照上面的步骤,我们就可以手工重建 SBS2011 的 SharePoint 站点(Internal Web site),虽然步骤看似简单,但是却能从中了解和学习到很多 SBS2011 的相关知识,并获得非常有价值的经验和心得!整个操作过程可能会出现一些小意外,比如站点未从 IIS 完全删除,或创建的应用程序站点无法访问等。结尾,再来个经验提示,如果出现站点无法访问,但可以通过内部域名(companyweb)访问,则需要检查一下 SBS SharePoint 这个站点的“绑定”设置,是否分配了正确的证书,gOxiA 实际测试中发现有时通过 SharePoint 管理中心创建的 SSL 站点貌似无法自动分配 SSL 证书。
[WS8] 微软发布 Windows Server 8 Beta Virtual Labs
微软发布 Windows Server“8”Beta Virtual Labs
关注 Windows Server“8”Beta(已经被证实命名为:Windows Server 2012)的同学们有福了,微软近日在 TechNet 网站上发布了一些列关于 Windows Server“8”Beta 的在线动手实验,内容非常丰富!如果目前你还未有测试环境,那么现在就可以免费使用微软提供的虚拟实验室了,每个实验提供了一份手册和长达90分钟的测试使用。在开始之前建议大家先阅读一下系统要求。
目前 Windows Server“8”Beta Virtual Labs 提供了如下相关的动手实验:
- Active Directory Deployment and Management Enhancements
In this lab, you will learn how to deploy Active Directory Domain Controllers with Windows Server "8". You will deploy domain controllers using the new Server Manager, as well as deploying remote domain controllers using Windows PowerShell. You will be able to explore the new Active Directory Management tool and use its PowerShell History Viewer. - Configuring a Highly Available iSCSI Target
In this lab, you will learn how Windows Server "8" can provide storage remotely to any machine. You will build clusters using shared storage and build iSCSI high-availability instances--observing highly available application communication during cluster failover. - Configuring Hyper-V over Highly Available SMB Storage
In this lab, you will learn how to configure a file server cluster to support running Hyper-V virtual machines from SMB file shares. You will create the file share, configure delegation, and then create a new VM on SMB storage. - Implementing Storage Pools and Storage Spaces
In this lab, you will work with the new storage spaces technology in Windows Server "8". You will first create new storage pools and virtual disks, and then you will work with those virtual disks in both Server Manager and Control Panel. - Introduction to Windows PowerShell Fundamentals
Windows PowerShell is a command-line shell and scripting language that helps you achieve greater control and productivity. Using a new admin-focused scripting language, more than 230 standard command-line tools, and consistent syntax and utilities, Windows PowerShell enables you to more easily control system administration and accelerate automation. - What’s New in Windows PowerShell 3.0
In this lab, you will explore some of the new features and functionality in Windows PowerShell 3.0 to enable you to more easily control system administration and accelerate automation. - Managing Branch Offices
In this lab, you will learn how the branch office scenario has been improved in Windows Server "8" including new branch cache enhancements. - Managing Network Infrastructure
In this lab, you will explore new network management capabilities in Windows Server "8". You will learn how to implement Network Teaming as well as how to implement DHCP failover. Finally, explore new Windows PowerShell cmdlets for network management. - Managing Your Network Infrastructure with IP Address Management
Network management is core to running a business, yet the tools that IT professionals need can be too costly or not available from Microsoft. With Windows Server "8", we change that with the introduction of IP Address Management (IPAM). - Managing Windows Server "8" with Server Manager and Windows PowerShell 3.0
In this lab, you will learn how the Server Manager and Windows PowerShell framework in Windows Server "8" delivers an enhanced, multi-server management experience. You will learn to perform tasks such as multi-server management. You will also explore new Windows PowerShell capabilities including new cmdlets and the Windows PowerShell gateway. - Online Backup Service
In this lab, you will use Windows Server Backup to back up your critical data to Windows Azure. This lab will teach you the entire set of workflows around backing up and recovering your data to Windows Azure. - Using Dynamic Access Control to Automatically and Centrally Secure Data
In this lab, you will explore Dynamic Access Control in Windows Server "8". You will learn how to create Central Access Policies, explore the new Access Denied Remediation features, as well as learn how to use the audit capabilities built into Dynamic Access Control.
以上信息来源:http://technet.microsoft.com/en-us/windowsserver/hh968267.aspx
[WS8] Windows Server 8 Beta 支持 FullServer & ServerCore 模式自由切换
Windows Server 8 Beta 支持 FullServer & ServerCore 模式自由切换
ServerCore(服务器核心)自 Windows Server 2008 开始被引入到其安装选项中,直至 Windows Server 2008 R2!而那时系统管理员必须为 FullServer 还是 ServerCore 做出艰难的选择!因为模式一旦选定就无法在日后更改,否则就需要重新安装操作系统。而现在我们无需再考虑这些问题,因为 Windows Server 8 支持 FullServer & ServerCore 模式自由切换!这一改进除了受用户的反馈以外,自微软方面似乎也非常重视 ServerCore,并拟在未来推荐用户从 ServerCore 开始安装自己的服务器。
gOxiA 认为这一战略视角是非常值得推崇的,当一位系统管理员计划部署一台新服务器时,首先考虑的就是这台服务器的角色和功能,如果仅是单一的服务职能,那么 ServerCore 将是一个非常好的选择,因为 ServerCore 占用更少的硬件资源;由于精简了很多图形(GUI)组件和功能,使系统更加稳定、可靠和安全;同时也就减少了修补程序的数量。
Windows Server 8 在开发者预览版时曾提供了三种安装模式:Full Installation(完整安装,即 FullServer)、Server Core Installation(服务器核心安装,即 ServerCore)、Features On Demand(功能上的需求),下表展示了他们之间的差异。
| 完整安装 | 功能上的需求 | 服务器核心安装 | |
| Windows 核心 | o | o | o |
| PowerShell | o | o | o |
| .Net Framework 4 | o | o | o |
| 服务器管理器 | o | o | |
| 管理控制台(MMC) | o | o | |
| 控制面板子集程序 | o | ||
| 控制面板程序 | o | ||
| Windows 帮助 | o | ||
| 资源管理器 | o | ||
| 浏览器 | o |
而在 Windows Server 8 Beta 中只提供了“服务器核心安装”(FullServer)和“完整安装”(ServerCore)模式,这两种模式被列入 Windows 功能(Features)中,名为“用户界面和基础结构”,而其下包含了三个功能:“图形管理工具和基础结构”、“服务器图形 Shell”、“桌面体验”,前两者是 FullServer 的默认安装项。
如果要从 FullServer 切换至 ServerCore,可以使用“删除角色和功能”来卸载“用户界面和基础结构”功能,或通过命令行卸载。
如果要从 ServerCore 切换至 FullServer,则执行如下命令行:


